Using VSCode Backend on DARWIN
Download and install
- Install the Stable Build VSCode on the local machine. DO NOT install the VSCode Insiders Build, as it will not work with the proxy. If the version of VSCode downloaded is newer than version 1.90, please make sure to do these additional steps.
- Install a supported SSH client.
- In the extensions tab of VSCode, search for Remote - SSH and install.
Setting up remote connections
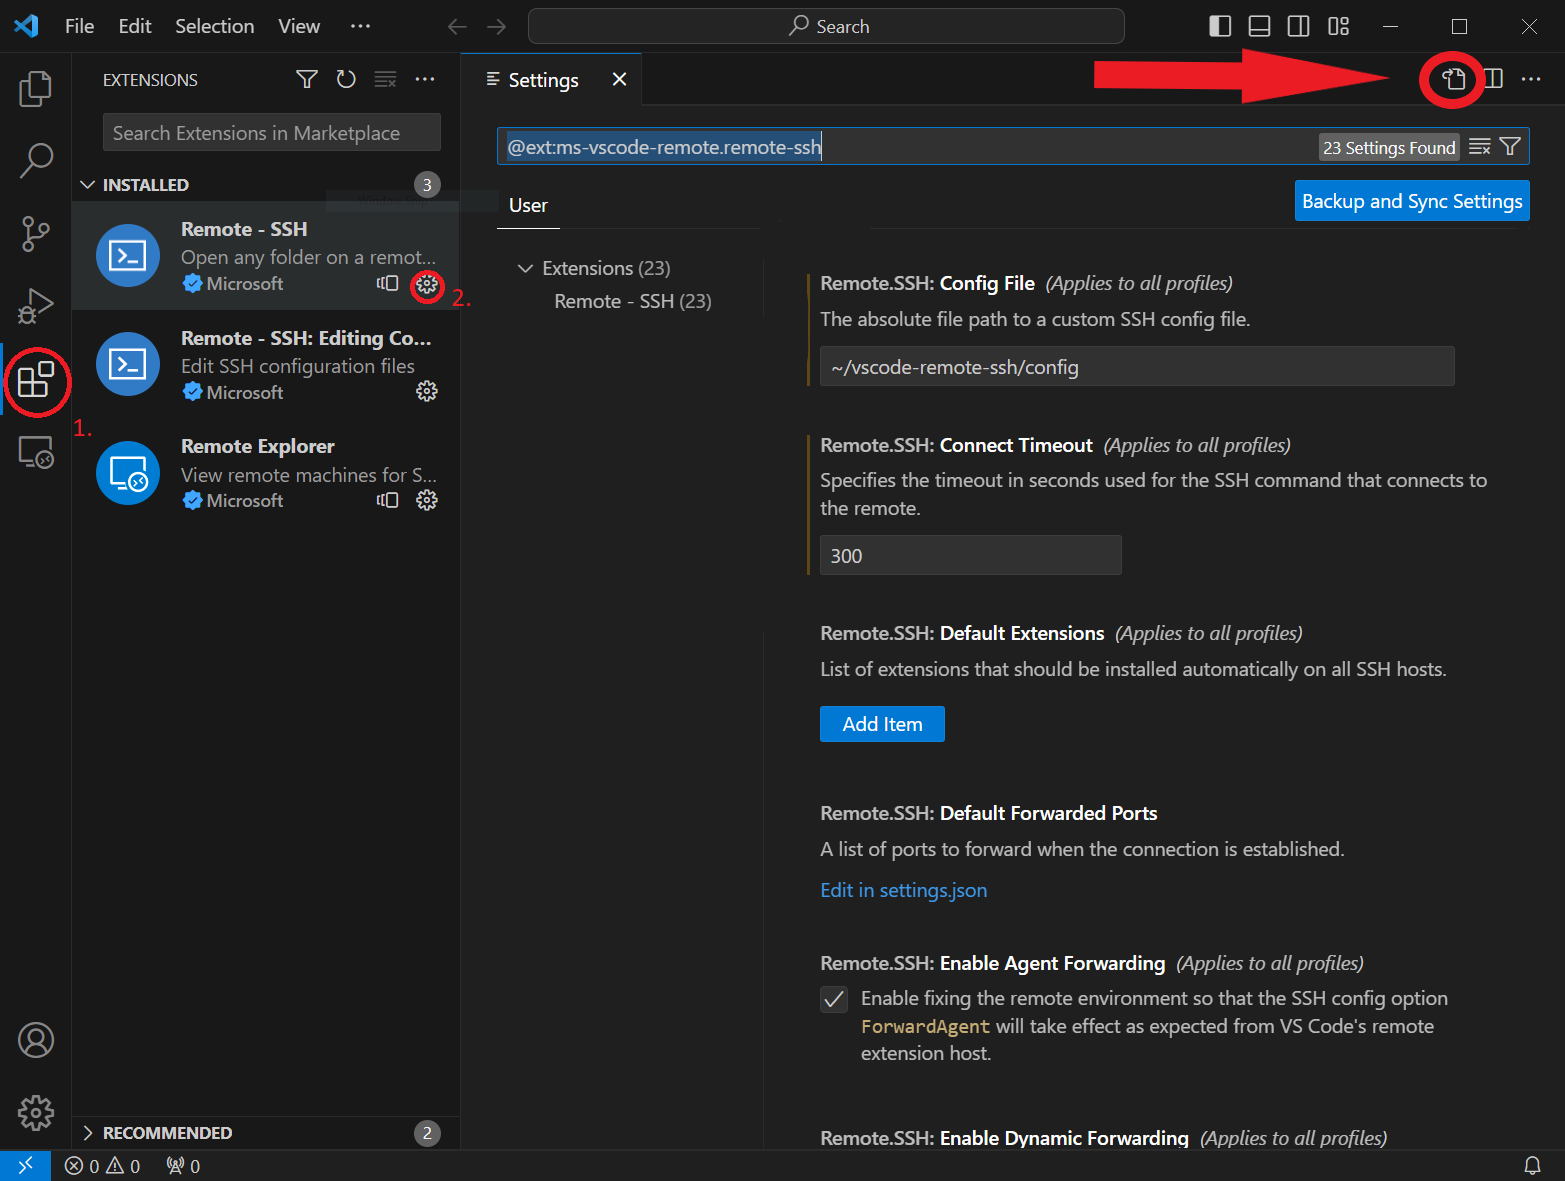
First, open VSCode on your computer. You'll see an icon on the left-hand side that looks like a square with some smaller squares inside it; this is the Extensions icon (labeled 1). Click on that icon to open the Extensions view. In the search bar at the top, type Remote - SSH and hit Enter. You'll see the Remote - SSH extension in the search results. Click on the gearwheel icon (labeled 2) located on the right side of the extension, and a drop-down menu will appear. Select Extension Settings from this menu.
The remote.SSH settings are written as a JSON dictionary and can be edited by clicking on the icon for Open Settings (JSON) located in the upper right corner below the title bar of the window (marked with large red arrow).This will open a the {} settings.json file and display each remote.SSH settings. Note: You will need to create a separate SSH Config file for the 'Remote - SSH' extension without modifying the regular SSH Config file, referred to as ~/vscode-remote-ssh/config below.
To ensure the settings are correct, remove all existing lines in {} settings.json and replace them with these lines between the { }
    "remote.SSH.configFile": "~/vscode-remote-ssh/config",
    "remote.SSH.connectTimeout": 300,
    "remote.SSH.defaultForwardedPorts": [],
    "remote.SSH.maxReconnectionAttempts": 0,
    "remote.SSH.localServerDownload": "off",
    "remote.SSH.lockfilesInTmp": true,
    "remote.SSH.useLocalServer": true,
    "remote.SSH.useExecServer": false,
    "remote.SSH.enableRemoteCommand": true
Clicking on the X next to {} settings.json will prompt you to save the settings file. Again keep in mind ~/vscode-remote-ssh/config is used for illustrative purposes. You can change this to specify the path and filename of choice. The Connect Timeout is set to 300 seconds in order to allow Slurm enough time to schedule and launch the interactive job.
{} settings.json can be found at:| Linux | ~/.config/Code/User/settings.json |
|---|---|
| Windows | %APPDATA%\Code\User\settings.json |
| Mac | ~/Library/Application\ Support/Code/User/settings.json |
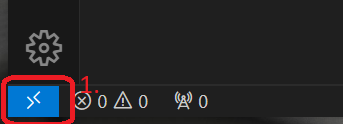
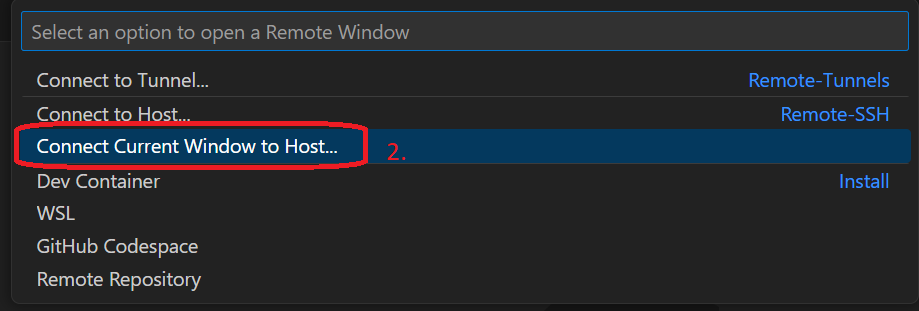
Now, click on the X to close the Settings tab for the Remote - SSH Extensions Settings. On the lower left corner, click the button Open a Remote Window(or F1), select Connect Current Window to Host and then Configure SSH Hosts.
It will open the Config file located in the path specified by ~/vscode-remote-ssh/config. You can have multiple configurations used for DARWIN with different Host definitions. For example, in the following Config file, Host DARWIN starts the interactive job using it_css workgroup and idle partition and requests one CPU for the remote shell to use. Host DARWINGPU requests to use a GPU and Host DARWINMPI can be used for MPI.
For this example, the Config file ~/vscode-remote-ssh/config contains the following definitions (remember User traine should be replace with your username as well as possible partition and other options)
# Read more about SSH config files: https://linux.die.net/man/5/ssh_config
# Request CPU in idle partition
Host DARWIN
    HostName darwin.hpc.udel.edu
    User traine
    Forwardx11 no
    ForwardX11Trusted no
    RemoteCommand vscode-shell-proxy -g it_css --salloc-arg=--partition=idle --salloc-arg=--cpus-per-task=1 --salloc-arg=--time=01:00:00

# Request GPU use
Host DARWINGPU
    HostName darwin.hpc.udel.edu
    User traine
    Forwardx11 no
    ForwardX11Trusted no
    RemoteCommand vscode-shell-proxy -g it_css --salloc-arg=--partition=idle --salloc-arg=--time=01:00:00 --salloc-arg=--gpus=1

# For MPI code development
Host DARWINMPI
    HostName darwin.hpc.udel.edu
    User traine
    Forwardx11 no
    ForwardX11Trusted no
    RemoteCommand vscode-shell-proxy -g it_css --salloc-arg=--partition=idle --salloc-arg=--time=01:00:00 --salloc-arg=--cpus-per-task=1 --salloc-arg=--ntasks=8
The vscode-shell-proxy is the Python script executed on the login node to connect the interactive job. A symbolic link vscode-shell-proxy was added to /usr/local/bin on the login nodes. The --help command show the usage of vscode-shell-proxy:
usage: vscode-shell-proxy.py [-h] [-v] [-q] [-l <PATH>] [-0 <PATH>] [-1 <PATH>] [-2 <PATH>] [-b <N>] [-B <N>]
                             [-H <HOSTNAME>] [-p <N>] [-g <WORKGROUP>] [-S <SLURM-ARG>]

vscode remote shell proxy

options:
  -h, --help            show this help message and exit
  -v, --verbose         increase the level of output as the program executes
  -q, --quiet           decrease the level of output as the program executes
  -l <PATH>, --log-file <PATH>
                        direct all logging to this file rather than stderr; the token "[PID]" will be replaced with
                        the running pid
  -0 <PATH>, --tee-stdin <PATH>
                        send a copy of input to the script stdin to this file; the token "[PID]" will be replaced with
                        the running pid
  -1 <PATH>, --tee-stdout <PATH>
                        send a copy of output to the script stdout to this file; the token "[PID]" will be replaced
                        with the running pid
  -2 <PATH>, --tee-stderr <PATH>
                        send a copy of output to the script stderr to this file; the token "[PID]" will be replaced
                        with the running pid
  -b <N>, --backlog <N>
                        number of backlogged connections held by the proxy socket (see man page for listen(), default
                        8)
  -B <N>, --byte-limit <N>
                        maximum bytes read at one time per socket (default 4096
  -H <HOSTNAME>, --listen-host <HOSTNAME>
                        the client-facing TCP proxy should bind to this interface (default 127.0.0.1; use 0.0.0.0 for
                        all interfaces)
  -p <N>, --listen-port <N>
                        the client-facing TCP proxy port (default 0 implies a random port is chosen)
  -g <WORKGROUP>, --group <WORKGROUP>, --workgroup <WORKGROUP>
                        the workgroup used to submit the vscode job
  -S <SLURM-ARG>, --salloc-arg <SLURM-ARG>
                        used zero or more times to specify arguments to the salloc command being wrapped (e.g.
                        --partition=<name>, --ntasks=<N>)
vscode-shell-proxy itself on the login node, as it will start a remote interactive session.
Connect VSCode to compute node
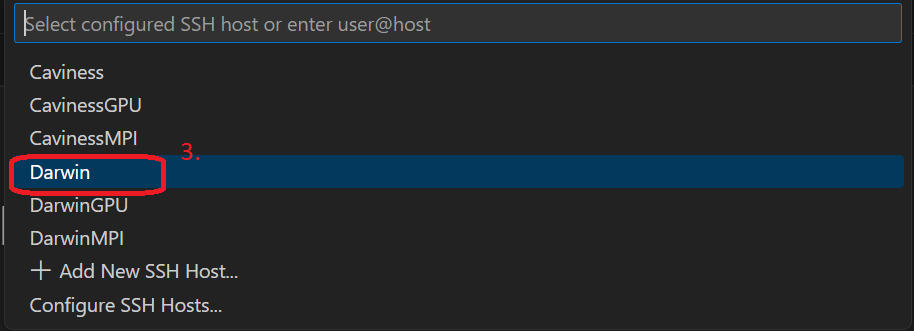
Now, we can connect the VSCode to the compute node. Follow the similar steps when adding the Config file from the Setting up Remote Connections except step 3. Since we created the host named "DARWIN", choose it and enter the credentials for DARWIN login (or use SSH keys).
After successful login, you will now connect to the compute node. You can use the bash shell as the SSH terminal or develop code in VSCode.
[(it_css:traine)@r1n00 ~]$ hostname
r1n00
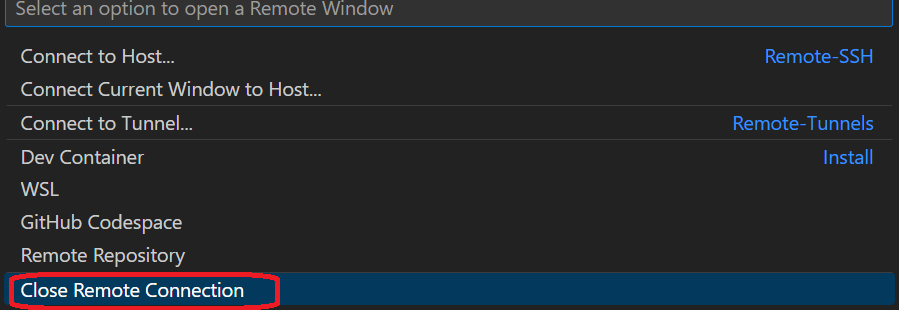
You also can open the file on your home directory in DARWIN and edit it. After completing the job, click Close Remote Connection to stop the job.
Additional Steps required for VSCode newer than version 1.90
Recent releases of VSCode require a newer version of wget than the system's default version on DARWIN. This discrepancy can result in a "connection failed" error as reported and discussed here. To resolve this, wget v1.24.5 has been installed at /opt/shared/wget/bin/wget.
~/bin directory by following the steps below:
1. Create a bin directory in your home directory (if it doesn't already exist):
mkdir ~/bin
2. Create a symbolic link for wget v1.24.5 in the ~/bin directory:
ln -s /opt/shared/wget/1.24.5/bin/wget ~/bin/wget
3. Modify your ~/.bash_profile on DARWIN:
Update the PATH variable by changing the line from:
PATH=$PATH:$HOME/.local/bin:$HOME/bin
to:
PATH=$HOME/.local/bin:$HOME/bin:$PATH
4. Apply the changes to your ~/.bash_profile:
After making the changes, you can apply them by either logging out and back in or by running:
source ~/.bash_profile
Using SSH keys
SSH public key authentication is a secure way to authenticate with an SSH host by combining a local "private" key with a "public" key associated with your user account. Once you set up the SSH keys, you will not need to enter the password for every login. If you have previously set up your SSH keys (i.e. you can login with SSH to DARWIN without having to enter your password), then you do not need to do this step unless you want to create SSH keys specifically for VSCode. Please only generate the SSH keys on the trusted computer. For macOS / Linux, you can run the following command in a local terminal:
ssh-keygen -t ed25519 -f ~/.ssh/id_ed25519-remote-darwin
export USER_AT_HOST="your-user-name@darwin.hpc.udel.edu"
export PUBKEYPATH="$HOME/.ssh/id_ed25519-remote-darwin.pub"
ssh-copy-id -i "$PUBKEYPATH" "$USER_AT_HOST"
For Windows, run the following command in a local PowerShell as administrator:
ssh-keygen -t ed25519 -f "$HOME\.ssh\id_ed25519-remote-darwin"
$USER_AT_HOST="your-user-name@darwin.hpc.udel.edu"
$PUBKEYPATH="$HOME\.ssh\id_ed25519-remote-darwin.pub"

$pubKey=(Get-Content "$PUBKEYPATH" | Out-String); ssh "$USER_AT_HOST" "mkdir -p ~/.ssh && chmod 700 ~/.ssh && echo '${pubKey}' >> ~/.ssh/authorized_keys && chmod 600 ~/.ssh/authorized_keys"
Open VSCode and run "Remote-SSH: Open Configuration File" in the Command Palette (F1). Then, select ~/vscode-remote-ssh/config and add or modify a host entry as shown below:
Host DARWIN
    HostName darwin.hpc.udel.edu
    User traine
    Forwardx11 no
    ForwardX11Trusted no
    RemoteCommand vscode-shell-proxy -g it_css --salloc-arg=--partition=idle --salloc-arg=--cpus-per-task=4
    IdentityFile ~/.ssh/id_ed25519-remote-darwin
For more information, please refer to SSH tips.
