Using VNC for X11 Applications
The X11 graphics standard has been around for a long time. Originally, an X11 program would be started with $DISPLAY pointing directly to an X11 display on another computer on the network: the X11 traffic traversed the network unencrypted and unfiltered. Eventually this insecure method was augmented by SSH tunneling of the X11 traffic: with a local X11 server, the ssh to the remote system piggybacked the X11 traffic on the encrypted connection to the remote system. This made the X11 traffic secure when traversing networks.
The X11 protocol can be very slow, especially with the addition of encryption and hops through wireless access points and various ISPs across the Internet. For interactive GUIs the lag can become very apparent and make the program difficult to impossible to use as expected.
The VNC remote display protocol is better-optimized for transmission across networks. A VNC server running on a cluster login node can be used as the target X11 display for applications running throughout the cluster. Akin to tunneling of X11, the VNC protocol can be tunneled across an SSH connection between the user's computer and the cluster. A VNC viewer running on the user's computer then interacts with the applications displayed in the VNC server on the cluster via the SSH tunnel.
On the Cluster
Starting a VNC Server
In reality, a user only needs a single VNC server running on a login node of a cluster. The same VNC server can be reused as the display for multiple X11 applications. This is particularly important under the default startup mode for a VNC server, which launches a full graphical desktop in the display. The desktop includes a large number of processes, so it is preferable to keep the number of such VNC servers to a minimum.
If you already have a VNC server running on the cluster, note the display (as $DISPLAY) and proceed to the next section. The display can be found by running the following commands on the login node on which the VNC server is running:
$ hostname
login01
$ vncserver -list

TigerVNC server sessions:

X DISPLAY #	PROCESS ID
:1		5429
Thus, $DISPLAY is understood to be login01:1.
By default a new VNC server will detach from your login shell and execute in the background, so it will not be killed when your SSH session is closed. So it need not be started from inside a screen or tmux session. The VNC server will also automatically choose a $DISPLAY for the new server:
$ vncserver

New 'login01:4 (user)' desktop is login01:4

Starting applications specified in /home/user/.vnc/xstartup
Log file is /home/user/.vnc/login01:4.log
In this case the $DISPLAY is understood to be login01:4 – display number 4 on host login01. The display number corresponds with a TCP/IP port number that will be necessary when creating the SSH tunnel for remote access to the VNC server and is calculated by adding 5900 to the display number: for display number 4, the TCP/IP port is 5904.
vncserver, then you will be ask to set a password. This should NOT be your login password! This mechanism only deters unauthorized connections; it is not fully secure, as only the first eight characters of the password are saved. Make sure to remember that password as you will need to use it to login into your VNC Viewer client in the future. If you forget your password then you can use the vncpasswd command on the cluster to reset your VNC Server password.
Configuring X11 Display
With a VNC server running on the cluster login node, first ensure the shell has the appropriate value for $DISPLAY – in this example the VNC server started in the previous section will be used:
$ echo $DISPLAY

$ export DISPLAY="login01:4"
You may wish to confirm the display is working:
$ xdpyinfo | head -5
name of display:    login01:4
version number:    11.0
vendor string:    The X.Org Foundation
vendor release number:    11903000
X.Org version: 1.19.3
There are two ways to submit interactive jobs to Slurm with the VNC server acting as the X11 display.
Direct and Unencrypted
The private network inside the cluster is much more secure than the Internet at large, so transmission of the X11 protocol without encryption (between compute nodes and login nodes all within that private network) is likely satisfactory for most use cases. Having $DISPLAY set in the interactive job's shell is sufficient:
$ salloc [...] srun --pty --export=TERM,DISPLAY /bin/bash -l
salloc: Granted job allocation 13504701
salloc: Waiting for resource configuration
salloc: Nodes r00n56 are ready for job

[(group:user)@r00n56 ~]$ echo $DISPLAY
login01:4

[(group:user)@r00n56 ~]$ xdpyinfo | head -5
name of display:    login01:4
version number:    11.0
vendor string:    The X.Org Foundation
vendor release number:    11903000
X.Org version: 1.19.3
X11 applications launched in this interactive shell will display to the VNC server running on the login node without encryption of the packets passing across the cluster's private network.
Tunneled and Encrypted
The Slurm job scheduler has the ability to tunnel X11 traffic between the compute and login nodes. The tunneled traffic is encrypted in-transit, as well. To use tunneling, the $DISPLAY must be set properly on the login node (see above) before issuing the salloc command.
For Slurm releases of version 19 onward, the tunneling is effected using Slurm's own RPC infrastructure and no caveats are necessary to the value of $DISPLAY.
For older Slurm releases – notably, the 17.11.8 release currently used on Caviness – the X11 tunneling is implemented via SSH tunneling back to the submission node and requires:
- The user MUST have an RSA keypair (named
~/.ssh/id_rsaand~/.ssh/id_rsa.pub) which grants passwordless SSH to the cluster login node(s) - The VNC server MUST be running on the same login node from which the
salloccommand will be executed. - The
$DISPLAYMUST have a trailing screen number present.
On Caviness all users' have an RSA keypair generated in ~/.ssh/id_rsa and ~/.ssh/id_rsa.pub when the account is provisioned. After ensuring your login shell is on the same node on which the VNC server is running, the final condition can be met by augmenting the variable:
$ export DISPLAY="${DISPLAY}.0"
With the $DISPLAY set, the interactive job is launched as
$ salloc --x11 [...]
salloc: Granted job allocation 13504764
salloc: Waiting for resource configuration
salloc: Nodes r00n56 are ready for job

[(group:user)@r00n56 ~]$ echo $DISPLAY
localhost:42.0

[(group:user)@r00n56 ~]$ xdpyinfo | head -5
name of display:    localhost:42.0
version number:    11.0
vendor string:    The X.Org Foundation
vendor release number:    11903000
X.Org version: 1.19.3
Stopping a VNC Server
Once all X11 applications have finished executing and there is no immediate ongoing need for the VNC server, it is good computing manners to shutdown the VNC server1). The server can be shutdown on the login node on which it is running. Again, the vncserver command can be used:
$ vncserver -list

TigerVNC server sessions:

X DISPLAY #	PROCESS ID
:4		6543

$ vncserver -kill :4
Killing Xvnc process ID 6543
On the Desktop/Laptop
To view the VNC server that is running on a cluster login node you must:
- Have VNC viewer software installed on the desktop/laptop
- Tunnel the VNC protocol to the login node
Satisfying these two requirements varies by operating system.
Mac OS X
Mac OS X includes a built-in VNC viewer which can be accessed using the Go > Connect to Server… menu item in the Finder. The URL to use will look like:
vnc://localhost:«port»
where the «port» is the local TCP/IP port that will be associated with the VNC server on the tunnel.
Given the display on the cluster login node:
login01:4
the TCP/IP port on the login node is (5900 + 4) = 5904 as previously discussed. We'll use the same TPC/IP port on the desktop/laptop side of the tunnel:
[my-mac]$ ssh -L 5904:login01:5904 -l «username» «cluster-hostname»
As long as that SSH connection is open, the desktop/laptop can connect to the cluster VNC server with the URL
vnc://localhost:5904/
If the SSH connection is broken, connectivity to the cluster VNC server can be reestablished by means of the same ssh command cited above.
Windows
Windows it is a bit more complicated, because there is not a built-in SSH client nor a built-in VNC viewer. As such we provide an example based on making a connection to DARWIN on login node (login00) using PuTTY for ssh and REAL VNC Viewer software.
Given display on the DARWIN cluster login node (login00):
login00:1
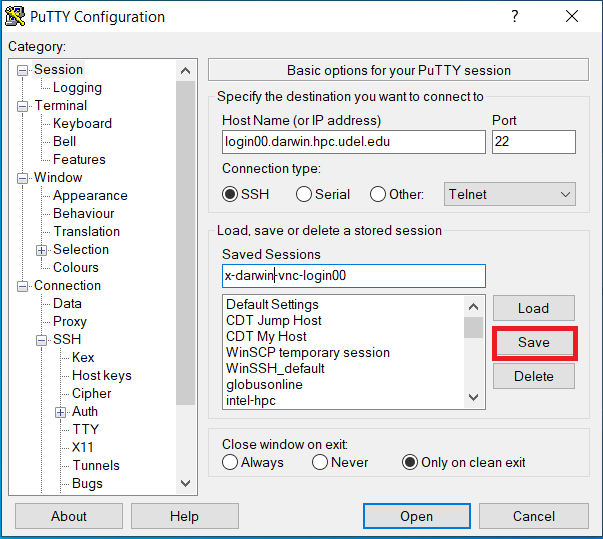
the TCP/IP port on the login node is (5900 + 1) = 5901 as previously discussed. We'll use the same TPC/IP port on the desktop/laptop side of the tunnel to setup a PuTTY session to connect to DARWIN's login node login00 and the tunnel to port 5901. You likely already configured an X11 forwarding connection to DARWIN for PuTTY, however you should Load that saved session, make the appropriate changes for the correct login node and tunnel port, and type in the Saved Sessions something like x-darwin-vnc-login00. The PuTTY Configuration must set the correct Host Name for login00
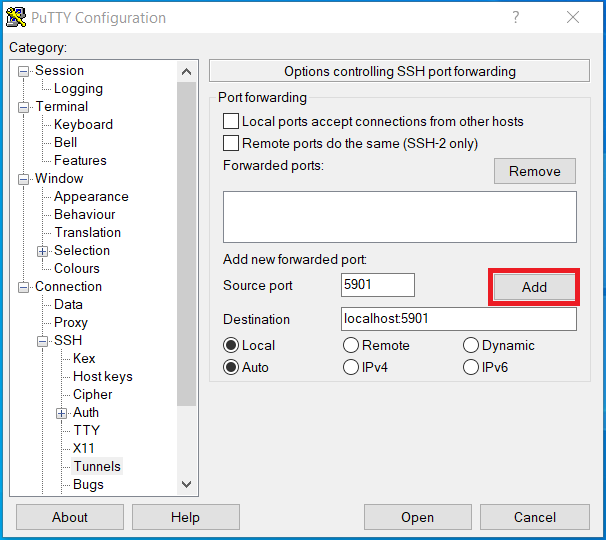
Now setup the tunnel by clicking on + next to SSH under Connection in the Category: pane, then click on Tunnels. Now enter the Source port and Destination and click Add
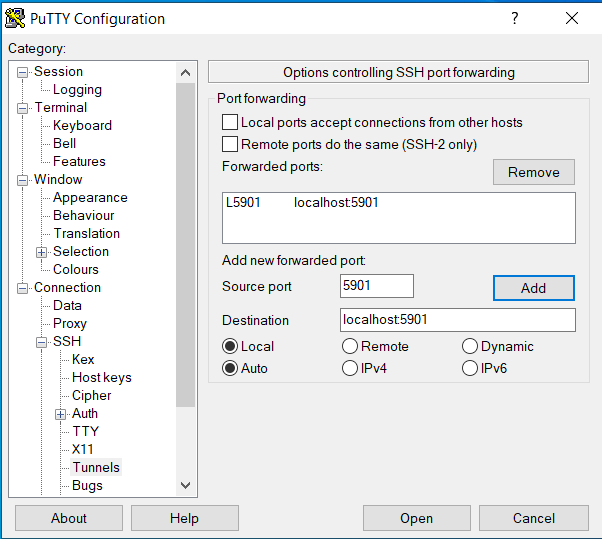
Once added, the Putty Configuration will look like this
Now save your session by clicking on Session in the Category: pane, type the name in the Saved Sessions x-darwin-vnc-login00 and click Save.
Now click Open to connect to the cluster VNC server on DARWIN login00 with port tunnel 5901. If this SSH connection is broken, connectivity to the cluster VNC server can be reestablished by reconnecting this SSH connection using the PuTTY saved session x-darwin-vnc-login00.
Once the REAL VNC viewer client is installed, then you need to configure it for the correct TCP/IP port on the login node.
- Open the REAL VNC viewer software.
- Add a new connection to localhost:«port»
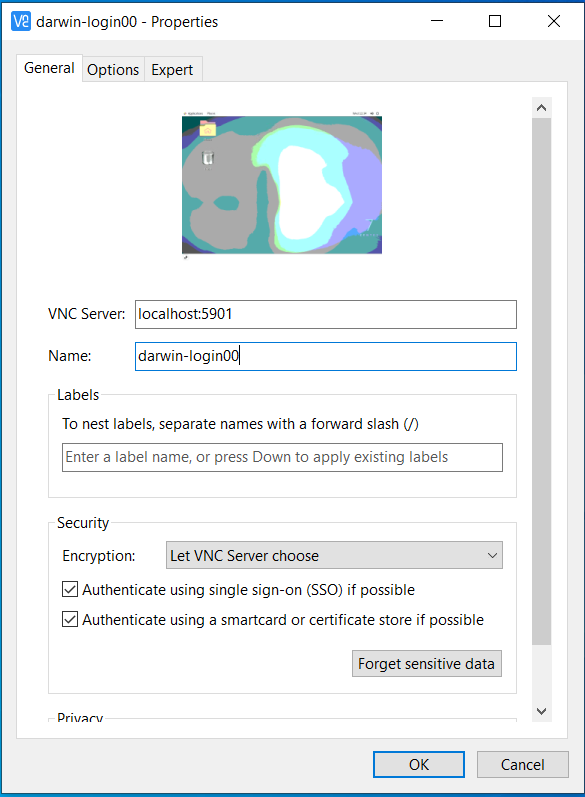
where the «port» is the local TCP/IP port that will be associated with the VNC server on the tunnel. Click File then New Connection and set the properties for VNC Server: localhost:5901 and Name: darwin-login00.
Click OK to save it, then double-click on darwin-login00 enter the password you configured when you setup the VNC server on the cluster, and it will open the VNC Viewer for login00:1 on DARWIN and what you run on DARWIN compute node(s) established with salloc will now be displayed in the VNC Viewer.


